Composite decking offers homeowners a durable, low-maintenance alternative to traditional wood materials. This deck building guide walks you through the essential steps for installing a composite deck, from initial planning and permitting to final inspection and ongoing care. Composite boards, made from recycled plastic and wood fibers, resist rot, warping, and insect damage, yielding a lifespan of up to 25–30 years under proper conditions (TimberTech). You will learn how to align your project with California code requirements and when to engage professional help for optimal results.

Why Choose Composite Decking for Orange County Homes
Orange County’s unique coastal climate presents specific challenges for outdoor structures. Here’s why composite decking excels in our region:
Salt Air Resistance
Homes near the coast in Newport Beach, Laguna Beach, and Huntington Beach face constant exposure to salt air. Unlike traditional wood decking, composite materials from brands like Trex, TimberTech, and Deckorators won’t corrode, rust, or deteriorate from salt exposure.
UV Protection
Southern California’s intense sun can fade and crack traditional wood. Premium composite boards feature UV protection that maintains color vibrancy for decades.
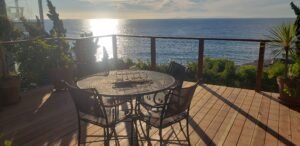
No Splinters for Barefoot Living
Orange County homeowners love outdoor living. Composite decking provides a smooth, splinter-free surface perfect for barefoot entertaining, children playing, and pets running around. Before heading onto your backyard deck, you or the kids may not have a pair of sandals or shoes nearby. Even if you did, putting them on could be a hassle if you are in a bit of a rush. Walking barefoot on a composite deck is convenient and worry-free.
Long-Term Cost Savings
While composite materials cost 8 to 12 dollars per square foot compared to 4 to 6 dollars for pressure-treated wood, the maintenance savings add up. No staining, sealing, or painting means you save 500 to 1,000 dollars annually in upkeep costs. Back when I used to have a wooden deck, I remember that having a contractor come over to do some repairs or sealings would get frustrating over time. The first couple years I did not mind but when it gets into those later years, I realized that the inconvenience of having someone come every year was more annoying than the cost itself.
Property Value Increase
According to Remodeling Magazine’s Cost vs. Value Report, deck additions in the Pacific region recoup 65 to 75 percent of costs at resale. Premium composite decks in desirable OC neighborhoods often see even higher returns.
Plan Your Project
Assess Your Needs
Begin by defining how you intend to use your deck—entertaining, dining, or relaxation. Consider size, shape, access points and integration with your home’s architecture. Review site preparation guide to determine whether existing terrain or structures require modification before installation.
Choose Composite Materials
Composite decking comes in various finishes, colors and performance levels. Compare boards based on:
- Composition ratio of recycled plastic to wood fibers
- Manufacturer warranties (often 20–30 years)
- Slip resistance and UV protection features
Not all composite decking is created equal. Here’s how the top brands compare:
Trex Decking (Most Popular)
- Lines: Trex Select, Trex Enhance, Trex Transcend Composition: 95 percent recycled materials
- Warranty: 25-year limited warranty Cost: 8 to 12 dollars per square foot
- Best For: Budget-conscious homeowners seeking proven performance
- OC Availability: Home Depot, Lowe’s, specialized dealers
TimberTech AZEK (Premium Choice)
- Lines: TimberTech Edge, Pro, Legacy, AZEK Composition: PVC or capped polymer
- Warranty: 30 to 50 year warranty depending on line
- Cost: 10 to 15 dollars per square foot Best For: Luxury homes, coastal properties, maximum durability
- Popular in: Newport Beach, Laguna Beach, Dana Point
Deckorators (Innovative Design)
- Lines: Deckorators Voyage, Heritage, Frontier Composition: Mineral-based composite with protective cap
- Warranty: 25 to 30 year warranty Cost: 7 to 11 dollars per square foot
- Best For: Homeowners seeking unique colors and textures with solid performance
- Special Features: Mineral-based technology resists mold and fading, wide color selection including popular grays and earth tones
- Popular Styles: Coastline Gray, Coastal Bluff, Castle Gray
Fiberon (Value Option)
- Lines: Good Life, Paramount, Concordia
- Composition: Recycled plastic and wood
- Warranty: 25 to 30 years Cost: 6 to 10 dollars per square foot
- Best For: Large deck projects with budget constraints
At OC Renovation Group, we help homeowners select the right composite material based on budget, aesthetic preferences, and performance requirements. Whether you’re considering Trex, TimberTech, Deckorators, or Fiberon, We provide expert guidance on which product best suits your specific Orange County location and lifestyle needs.
Refer to deck material for a detailed comparison of composite versus other options. Composite decking typically carries a higher upfront cost than pressure-treated wood but offers lower maintenance expenses over time.
Estimate Deck Costs
Estimate expenses in three categories: materials, labor and permitting. Use the formula:
- Calculate deck area (length × width).
- Multiply area by per-square-foot cost of composite boards and fasteners.
- Add substructure cost (joists, beams, footings).
- Include permit fees and inspection charges.
Explore average deck cost data for your region to set realistic budgets. As a result, you can adjust deck dimensions or material selections to match financial constraints. - If you need a more comprehensive estimate – Use OC Renovation Groups deck cost calculator to get an advanced idea of building cost.
Obtain Necessary Permits
Check Local Code
California building codes govern structural and safety requirements for decks. Decks attached to residences typically require permits that specify:
- Ledger board attachment standards
- Footing dimensions below frost line
- Railing height and baluster spacing
For prescriptive methods, consult the DCA6 Prescriptive Residential Wood Deck Construction Guide (Simpson Strong-Tie). Even though this guide addresses wood decks, ledger board, flashing and railing rules apply equally to composite installations.
Submit Permit Application
Gather the following documents:
- Scaled site plan showing deck footprint and setbacks
- Framing details (joist spacing, beam spans, footing locations)
- Material specifications for composite boards and fasteners
Submit to your local building department along with the permit fee. Permit processing can take two to four weeks. After approval, schedule inspections at critical milestones: footing, framing and final.

Prepare the Deck Site
Clear and Level Area
Remove vegetation, debris and obstacles from the footprint. Use string lines and batter boards to mark the perimeter. Excavate soil and apply gravel base where drainage improvements are needed. It is important to consider that building decks on slopes can be challenging. Carrying heavy beams in hard to access areas takes a team that is experienced in safety. There have been situations where we go the extra mile in ensuring a smooth path. There have been times where we have had to do extra digging to create pathways or even surface levels to be able to safely transport material across slope hills. This also included removing stubborn vegetation and vines that can grow out of control in some neighborhoods.
Mark Footing Locations
With your site plan, measure and mark footing spots based on joist spans and beam layout. Typical footing spacing ranges from 8 to 12 feet on center, depending on load requirements and joist dimensions.
Check Soil Conditions
Ensure soil can support deck loads. For sandy or clay soils, consider deeper footings or engineered solutions. You may need professional soil testing if soil stability is uncertain.
Essential Tools for Composite Deck Installation
Whether you’re planning a DIY installation or want to understand what your contractor will use, here are the essential tools required for a professional composite deck build in Orange County.
Power Tools Required
Miter Saw or Circular Saw A 10-inch or 12-inch miter saw with a fine-tooth carbide blade is essential for clean, accurate cuts in composite materials. Composite decking is denser than wood and requires sharp blades designed for plastics and composites. Brands like DeWalt, Makita, and Milwaukee offer reliable options. For larger projects, a sliding compound miter saw provides greater cutting capacity.
Impact Driver and Drill A cordless impact driver (18-volt or 20-volt) is necessary for driving screws through composite boards and into joists. Brands like Milwaukee M18, DeWalt 20V, and Makita 18V LXT provide sufficient power. You’ll also need a standard drill for pilot holes and hardware installation. Having two batteries per tool ensures uninterrupted work.
Circular Saw For rip cuts and breaking down large boards, a 7¼-inch circular saw with a fine-tooth composite blade is essential. This tool is particularly useful for cutting fascia boards and making length adjustments on site.
Jigsaw A jigsaw handles curved cuts around posts, obstacles, or decorative patterns. Use a fine-tooth blade designed for plastics to prevent chipping on composite materials.
Hand Tools and Measuring Equipment
Chalk Line and Measuring Tape A 25-foot or 30-foot measuring tape and a chalk line are fundamental for layout work. Use a chalk line to establish straight reference lines for the first deck board and ensure alignment throughout installation.
Speed Square and Framing Square A speed square (also called a rafter square) helps mark perpendicular cuts quickly. A larger framing square ensures joist layout accuracy and checks for square corners during framing.
Level and Post Level A 4-foot or 6-foot level verifies that joists, beams, and deck boards are properly aligned. A post level (wraps around posts) ensures vertical accuracy when installing support posts and railing posts.
Pry Bar and Hammer A flat pry bar helps with spacing boards and making adjustments during installation. A framing hammer is necessary for assembly work and setting temporary supports.
Spacers or Deck Board Spacer Tool Maintaining consistent 1/8-inch to 1/4-inch gaps between composite boards is critical. Specialized deck spacers or a spacing tool ensures uniform gaps for expansion and drainage. Some contractors use 16-penny nails as spacers, though purpose-made tools provide better consistency.
Specialized Deck Building Tools
Hidden Fastener Installation Tool If using hidden fastening systems like Trex Hideaway, Tiger Claw, or Deckorators Edge Clips, you’ll need the manufacturer’s installation tool. These tools ensure proper fastener placement and maintain consistent board spacing. Each system typically has a dedicated tool sold separately or included with fastener kits.
Composite Blade for Saws Standard wood-cutting blades can melt composite materials and create rough edges. Invest in blades specifically designed for composite decking with 60 to 80 fine teeth. Popular brands include Diablo, Freud, and DeWalt. Budget around 40 to 60 dollars per blade, and keep spare blades on hand for larger projects.
Post Hole Digger or Auger For setting footings, manual post hole diggers work for smaller decks. For larger projects or challenging Orange County soil conditions (clay or rocky terrain), a gas-powered auger or rental auger significantly speeds up the process. Rental costs typically run 75 to 150 dollars per day.
Safety Equipment (Non-Negotiable)
Safety Glasses and Hearing Protection Composite materials can create fine dust particles when cut. ANSI-rated safety glasses protect your eyes from debris. Foam or muff-style hearing protection is essential when operating power tools for extended periods.
Work Gloves and Knee Pads Cut-resistant work gloves protect hands from sharp edges on composite boards and metal hardware. Knee pads provide comfort during extended deck board installation and reduce joint strain.
Dust Mask or Respirator Cutting composite decking generates fine dust. An N95 dust mask or respirator protects respiratory health, especially important during extended cutting sessions.
Additional Equipment for Orange County Projects
Extension Cords and Generator Job sites without electrical access require a portable generator. A 3500 to 4000-watt generator powers most construction tools. Heavy-duty outdoor extension cords (12-gauge or 10-gauge) are necessary for tool operation at distances from power sources.
Wheelbarrow and Hand Truck Composite decking boards are heavy. A wheelbarrow helps move soil, concrete mix, and debris. A hand truck or dolly transports composite board bundles from driveway to work area, especially valuable on Orange County hillside properties or sites with access challenges.
Ladders and Scaffolding Step ladders (6-foot or 8-foot) are necessary for ledger board installation and overhead work. For elevated decks, scaffolding or work platforms provide safe access and reduce fatigue during extended projects.
Professional Tool Investment vs. DIY
For homeowners considering DIY installation, tool investment alone can range from 800 to 2,000 dollars for power tools, plus 200 to 400 dollars for specialized deck tools and safety equipment. Many Orange County homeowners find that professional installation through OC Renovation Group is cost-effective when factoring in tool purchases, learning curve, time investment, and warranty protection.
Professional contractors bring commercial-grade tools, experience with Orange County building codes, and efficiency that reduces project timelines from weeks to days. If you proceed with DIY, many tools are available for rental at local Home Depot or Lowe’s stores throughout Orange County, reducing upfront investment.
Install the Substructure
Set Footings
- Drill or dig holes to the depth specified by local frost line requirements (often 12–18 inches in coastal California).
- Pour concrete to form footings.
- Embed sonotubes or footing forms and allow 24–48 hours to cure before proceeding.
Install Ledger Board
Attach the ledger board to your home’s rim joist using through bolts or structural screws. Avoid nails, which lack sufficient shear strength. Position flashing above the ledger to divert water away from the house framing.
Attach Joists and Beams
Secure beams to footings using post bases rated for exterior use. Fasten joists to ledger and beam with approved joist hangers. Maintain consistent joist spacing—typically 16 inches on center for composite decking. If you plan diagonal board installation, tighten spacing to 12 inches on center.
Ensure Proper Flashing
Install metal or synthetic flashing between the ledger and house siding. Solder flashing joints or use self-adhering membranes to prevent water intrusion. This step protects both your home structure and the deck ledger.

Fit the Decking Boards
Layout the First Board
Starting at the house wall, position the first composite board flush against the ledger. Use a chalk line to ensure straight alignment. Lightly fasten the board to check spacing before proceeding.
Cut and Secure Boards
Measure and cut composite boards using a fine-tooth carbide blade for clean edges. Use manufacturer-approved hidden fasteners or surface fasteners as directed. Fasteners should be corrosion-resistant and compatible with composite materials to prevent gumming or staining.
Leave Expansion Gaps
Composite decking expands and contracts with temperature changes. Leave a minimum 1/8-inch gap at board ends and 1/4-inch gap between boards. Check manufacturer recommendations for precise tolerances.
Add Railings and Trim
Install Posts and Rails
Position railing posts at deck corners and midway along open edges. Posts must be bolted to framing with metal post bases or through-bolts. Attach top and bottom rails per manufacturer instructions. Verify rail height meets California code—36 inches minimum for residential decks.
Attach Trim Boards
Cover exposed joist ends and deck edges with composite fascia and trim boards. Secure trim with color-matched screws or clips. Trim provides a finished look and helps conceal substructure components.
Complete Inspection and Care
Inspect for Compliance
Request final inspection from building officials. Inspectors check:
- Ledger attachment and flashing
- Joist alignment and fastener types
- Railing height and guardrail assembly
- Footing depth and post anchorage
Approval ensures your deck meets safety and code standards.
Perform Ongoing Maintenance
Composite decks require minimal upkeep. To preserve appearance:
- Clean annually with a mild deck cleaner and soft-bristle brush
- Rinse debris from gaps to prevent staining
- Inspect fasteners and flashing periodically
Refer to maintenance for detailed cleaning and care recommendations.
Professional Assistance and Next Steps
A composite deck installation demands precise planning and execution. OC Renovation Group specializes in designing and installing composite decking systems that comply with California regulations and deliver long-term performance. If you prefer professional support or a turnkey solution, contact OC Renovation Group today. Visit our finding a contractor page or call us to schedule an on-site consultation. We will ensure your composite deck project proceeds smoothly, on time and within budget.
Ready to Get Started?
As Orange County’s trusted composite deck builder with OC Renovation Group, I’ve helped many homeowners make the switch. With decades of experience, I’ll give you honest advice about your project.
